Tuesday, 31 December 2013

Nature Based Playdough


I can't believe it is the last day of 2013!! It has been a wonderful year and I actually finished off some big projects that were hanging over me. I feel excited about 2014 and have some very BIG resolutions.
What about you??

As you know I am a lover of nature and can't go passed collecting lovely pieces for my home and classroom. This week when at the park I saw a beautiful piece of bark in an enormous pile. I took one piece and started to think of all the ways I could use it.


Here is one way of using the bark...... Place numbers on the bark.


Collect some leaves and encourage the children to draw patterns on them.


Help the children make some birds out of playdough. Roll a large ball for the body, a small ball for the head, pinch a beak and push a pen or similar to make some eyes.


Use the leaves as feathers and push them into the playdough birds.


Ask the children to identify the numbers on the bark and count the correct number of feathers.


This is a very inexpensive activity and has many educational benefits from fine motor skills through to several maths concepts. I love it because I think it is so important for children to appreciate the beauty in nature and that you can use resources that are in your backyard. Not everything is made of plastic and isn't bought at the shop.


Anyway, thanks for reading, commenting, sharing ideas and letting me know what you have tried out. Please continue to do so.
Have a wonderful new year!!


Monday, 23 December 2013

Christmas Stockings!!


Stocking Wrapping - 
I love brown paper as you know. I love it for drawing on, painting on, wrapping tasty goodies, making cards and for presents. This year, instead of wrapping all of our Christmas presents with brown paper and doilies, we decided to make some very cute brown paper Christmas stockings.

We printed the recipients name on the side with white paint....


We cut out the stocking to accommodate the gift.....

We decorated the paper stocking with patterns and doilies...


We wrapped the gifts and put them inside the stockings....


Very cute hey!!


Printing Fabric Stockings - 
At school, the three year olds printed hand prints to make Santa faces with fabric paint on red fabric. They then used a fabric marker to draw Santa's face on their hand print.

On the rest of the stocking they printed dots using a foam stamp and white fabric paint.

A LOVELY mother from the class brought her sewing machine in and sewed up the childrens stockings into amazing keep sakes for the children.

We painted a lovely fire place and mantle and proudly hung our stockings in the home corner. They looked so festive and beautiful.


HAPPY CHRISTMAS EVE !!! I hope you have a happy, safe and beautiful Christmas with all of your loved ones.
Niccola xx


Monday, 16 December 2013

Paper Decorations


Each year my kids and I make the Christmas decorations for our tree. As is the case every year we start with BIG plans and never have the time or energy to fulfill them. This year we have changed colour schemes at least four times and now have enough wrapping paper for the next 4 years!!!
These decorations cost us nothing as we had everything we needed at home. They were quick to make and I think they are pretty cute.


Christmas words provided the inspiration for the paper decorations we made. We brainstormed the words and images and then I wrote or drew them on the brown card circles. I used a darning needle to push the holes through the card (which hurt my fingers after a while) and then the kids sewed using embroidery cotton.
I glued another circle to the back and stuck some string between the two circles.


You could do stars, hearts, your childrens names, reindeer names.... Personalise it to suit you and your family.

Thursday, 5 December 2013

Candy Cane Inspired Ideas


I don't know about you, but my kids get given soo many candy canes leading up to Christmas but don't actually eat many- thank goodness. At school we have been doing some fun candy cane inspired activities that are very simple and festive.

Candy Cane Wrapping Paper
This actually looks very simple but was quite a tricky for the 3 year olds. They needed to start at the top of the page and paint a stripe from the left hand corner to the right. ( An important pre-writing / pre-reading activity ) They then had to complete the pattern of red, white, red all down the page.


Candy Cane Playdough
Once you have made up one batch of playdough you need to divide it into two and add red colouring to one half. At this stage it is also a great idea to add a few drops of peppermint essence so the playdough smells just like a real candy cane. I then gave the children a ball of both red and white playdough and they began by rolling two sausage shapes and attempted to twist them together. This activity promoted fine motor development and reinforced the fact that by mixing red and white you can make PINK!


Candy Cane Fine Motor Activity
At the light table this week I put out different length pipe cleaners and encouraged the children to twist them together to form candy canes which made simple but very cute tree decorations.


All these candy cane activities and we didn't eat one!!

Tuesday, 3 December 2013

Printing Angels


Tomorrow is our last day at school and we have made some beautiful gifts to give to the parents tomorrow for Christmas.
This year we printed with fabric paint on lovely cream linen tea towels to make Angels.


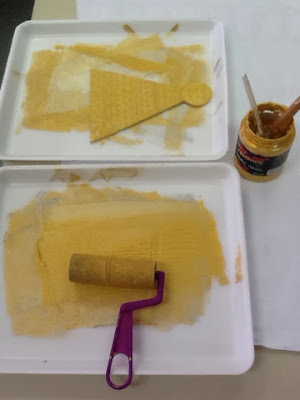
I have used this foam board before and explained that you can use any polystyrene tray to make impressions on.

After making the patterns or impressions on the foam board with a pen, you roll paint over the top and print onto the tea towel.


I then painted the childrens hands with gold fabric paint and they carefully placed them on the sides of the Angels bodies to create wings.


I think this is a simple, effective and useful gift that hopefully the parents will love.


Tuesday, 26 November 2013

The Nativity

Over the years I have helped the children make their own Nativity scene to take home. Some years I have been more adventurous than others. As my class consists of 3 and 4 year old children, I think that this is the perfect Nativity scene for them to make completely on their own. The pictures speak for themselves ...


Nativity Pebbles
A lovely teacher at school said she had seen some Nativity pebbles and asked me if I could paint her some. I tried to find pebbles that could stand on their own and ended up painting two sets so she could choose what she preferred.


I painted the pebbles with acrylic paint and they were quick to make and the children loved playing with them and telling the Nativity story.
Have a go at making your own or even printing out little pictures and gluing them on pebbles.


This set consists of pebbles that are all upright. The photo is deceiving and shows no dimension .


The pebbles on the wonder table at school.