Tuesday, 26 November 2013

The Nativity

Over the years I have helped the children make their own Nativity scene to take home. Some years I have been more adventurous than others. As my class consists of 3 and 4 year old children, I think that this is the perfect Nativity scene for them to make completely on their own. The pictures speak for themselves ...


Nativity Pebbles
A lovely teacher at school said she had seen some Nativity pebbles and asked me if I could paint her some. I tried to find pebbles that could stand on their own and ended up painting two sets so she could choose what she preferred.


I painted the pebbles with acrylic paint and they were quick to make and the children loved playing with them and telling the Nativity story.
Have a go at making your own or even printing out little pictures and gluing them on pebbles.


This set consists of pebbles that are all upright. The photo is deceiving and shows no dimension .


The pebbles on the wonder table at school.


Tuesday, 19 November 2013

Home Made Santa Land


I love Christmas and love setting up Christmas activities and small world play. I am using the Nativity blocks I made last year in the block area but thought I would make a little Santa village to promote play at the wonder table.


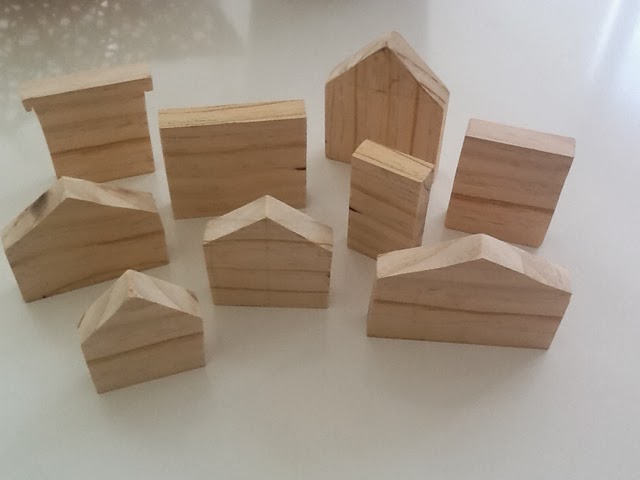
My lovely husband cut some wood into house shapes for me this week. After a quick sanding, they were ready to be painted. My son helped me paint patterns, windows and doors on the houses. We decided to only use red and white paint as we were trying to make the houses look like they were from Santa's village.


I added a wooden sleigh, Santa, Christmas lights, little figurines, pebbles, logs, a Christmas tree and some cotton wool for snow.


The children loved playing with the Christmas village and spent ages talking, sharing and throwing the snow everywhere. By the end of the day the poor Santa land looked like a demolition site but by the time they arrive tomorrow it will look as pretty as a picture.


Have a go at making some Christmas houses for a village in your home or classroom.


Tuesday, 12 November 2013

Recycling Milk Containers


I hate throwing away plastic containers as there are so many ways to recycle them. Here are a few ways to recycle plastic milk containers. Really, the possibilities are endless and it is great for children to think of ways to recycle in all aspects of their lives.


MILK CARTON POT PLANTS
After putting drainage holes in the base of the container, the children drew decorations on the sides of the milk carton with permanent markers. They then added potting mix and their seeds.


MILK CARTON FUNNELS
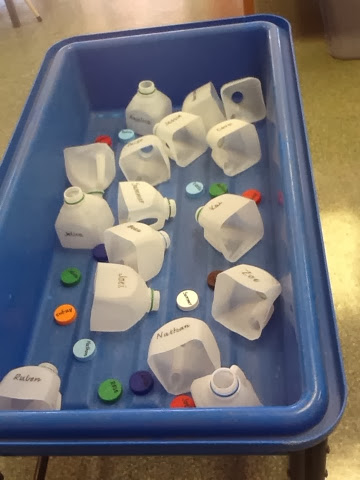
As we have been doing lots of name recognition activities at school, I wrote the childrens names on the  funnel part of the milk carton and the lid so they needed to match the names. They had lots of fun pouring, scooping and screwing the lids on and off.


MILK CARTON STAR DECORATIONS
At home we cut out stars and punched holes in them and my daughter threaded them onto string with straws.


Tuesday, 5 November 2013

Playdough Maths Activity


I have posted lots of posts on playdough before because it is one of the most wonderful resources teachers and parents can use to foster creativity, improve fine motor skills and teach many different concepts across the curriculum.

We have been learning our numbers through number rhymes, finger plays, counting songs and many different hands on activities both inside and in the playground.

Today we played with dice and playdough.


This is a very simple game but it is very effective and the children loved it.


The children rolled the dice. They then either counted the dots on the dice or if it was one of the smaller numbers they called it out straight away.( I was playing this with 3 and 4 year olds.)
They then rolled the corresponding number of playdough balls and put them on a plate. I then asked them to find the corresponding written number and put it on the plate as well.


The children were counting, talking, using maths language, developing fine motor skills, sharing and most importantly, learning through hands on play. The playdough table was quickly transformed into a restaurant with the playdough balls becoming meat balls!


Tuesday, 29 October 2013

Making a Blackboard

Blackboards are a wonderful resource to have in your home, in your garden or like me in the school playground. I decided to make two blackboards that are movable so I could put them together or apart around the playground. My husband put holes in each corner so we could hang them vertically, horizontally, next to each other or one above the other. This promotes a lot of different options and hopefully creates interest.


I bought two pieces of marine grade plywood so we could leave the boards outside in the elements.
I then applied two coats of blackboard paint to both sides and edges of the wood. This took days because it is an oil based paint and needs to dry thoroughly between coats.


I decided to leave two sides completely plain and to paint 'drawing prompts' on the other two sides to encourage creativity. I painted some feet along the bottom edge of one blackboard and an incomplete landscape scene along the edge of the other - all with exterior paint. The idea of painting on some 'drawing prompts' is to encourage the children to finish the pictures.


Have a go at making your own blackboard. Your kids will love it !!


Tuesday, 22 October 2013

Learning with Water


It is warming up here and the children are loving the two new water vessels we bought in the holidays. We are going through a lot of spare clothes at the moment with some children having to change their whole outfit completely but the parents are happy, the children are well supervised and learning many valuable things. I like to have water both inside and outside the classroom and use it to teach and reinforce many concepts.
Here are some of the ways water can be used throughout the curriculum.....

Science - floating and sinking
I put out two baskets with pictures showing items floating and sinking. The children are encouraged to test each item one at a time after guessing what will happen. They then they put the item in the corresponding basket. The results can then be counted and discussed.


Literacy - learning letters and our names
I wrote the childrens names and the letters of the alphabet on shells and put them in a fish bowl for the children to catch and identify. I added some green colouring to the water and some pebbles to make the activity a little more challenging.


Maths - counting
The children loved this activity. I put table tennis balls in the water trolley and added some spoons and a bowl. The children tried to pick up a ball with a spoon and transfer it to the bowl without dropping it. We then counted each ball we could get into the bowl.


Outdoor - water play
We change the contents of the water trolley each week to reinforce the topic we are talking about.
One water trolley is a natural looking pond that this week has had pebbles in it. The children added wood chips and we're pretending it was a giant bowl of soup!
Our other water vessel had pouring containers, funnels and tubes today which was a lot of fun.


Tuesday, 15 October 2013

Name Recognition


At school my class of three and four year olds have name tags for their bags, name tag charts and  various name labels around the room. They are becoming quite familiar with their name in the written form.
Here are a few examples of how to incorporate the children's names into different activities that are great fine motor activities and lots of fun - especially when you add a shaker of glitter!!


Playdough cakes with name candles:
I wrote the children's names on popsticks and added some glitter, patty cases and the regular playdough utensils. I then invited the children to make little cakes with sprinkles and of course pretend candles. The children were looking for their own name and some even recognised their friend's names. They were talking about the letters in their names and it stimulated a lot of great language. The children were learning while playing.
At home you could make family candles and make multiple names so that the children could sort all of the "Mum" candles and put them on one cake.


Pegging their name

At this activity the children needed to find their name that was attached to a container and then look for pegs that had the letters from their name. The children were talking, helping, sharing, problem solving, laughing, learning and having fun. Many children helped their friends look for certain letters and attempted to make their friends names.
This is a great fine motor activity. It reinforces the letter names and also helps the children learn the left to right orientation of their name.


Writing their name
Some children are showing an interest in beginning to write their name. Of course we encourage all attempts and don't put any pressure on the children. One good idea is to attach the child's name tag to a sketch book with a long ribbon. The child can then trace or copy their name if they show interest in doing so. The front of the book has a pocket to keep the name tag safe.